สัมภาษณ์ Spring GraphQL: Resolver, DataLoader และวิธีแก้ปัญหา N+1
เตรียมตัวสำหรับการสัมภาษณ์ Spring GraphQL ด้วยคู่มือที่ครบถ้วนนี้ Resolver, DataLoader, การจัดการปัญหา N+1, mutation และแนวปฏิบัติที่ดีที่สุดสำหรับคำถามทางเทคนิค
Spring for GraphQL ทำให้การรวม GraphQL ในแอปพลิเคชัน Spring Boot ง่ายขึ้น เทคโนโลยีนี้กลายเป็นสิ่งจำเป็นสำหรับ API สมัยใหม่ และคำถามสัมภาษณ์เกี่ยวกับหัวข้อนี้พบได้บ่อยมากขึ้น คู่มือนี้ครอบคลุมแนวคิดหลัก: resolver, DataLoader, ปัญหา N+1 และรูปแบบขั้นสูง
ผู้สรรหาทดสอบความเข้าใจเกี่ยวกับปัญหา N+1 และการใช้ DataLoader เป็นพิเศษ สองหัวข้อนี้คิดเป็น 60% ของคำถามในการสัมภาษณ์ Spring GraphQL
Spring for GraphQL คืออะไร?
Spring for GraphQL เป็นผู้สืบทอดอย่างเป็นทางการของ GraphQL Java Spring โดยถูกรวมเข้ากับ Spring framework โดยตรงตั้งแต่เวอร์ชัน 2.7 การรวมนี้นำมาซึ่งข้อดีหลายประการ: การรองรับ annotation ของ Spring, การรวมกับ Spring Security และการใช้ WebFlux หรือ MVC อย่างโปร่งใส
การกำหนดค่าพื้นฐานต้องการเพียง dependency spring-boot-starter-graphql และ schema GraphQL
dependencies {
    // Spring GraphQL starter พร้อม Spring MVC
    implementation("org.springframework.boot:spring-boot-starter-graphql")
    implementation("org.springframework.boot:spring-boot-starter-web")

    // สำหรับการทดสอบ GraphQL
    testImplementation("org.springframework.graphql:spring-graphql-test")
}
Schema GraphQL อยู่ใน src/main/resources/graphql/ พร้อมส่วนขยาย .graphqls
# schema.graphqls
type Query {
    # ดึงบทความตามตัวระบุ
    article(id: ID!): Article

    # รายการบทความแบบแบ่งหน้า
    articles(page: Int = 0, size: Int = 10): [Article!]!
}

type Article {
    id: ID!
    title: String!
    content: String!
    # ความสัมพันธ์กับผู้เขียน
    author: Author!
    # รายการความคิดเห็น
    comments: [Comment!]!
    createdAt: String!
}

type Author {
    id: ID!
    name: String!
    email: String!
    # บทความที่เขียนโดยผู้เขียนนี้
    articles: [Article!]!
}

type Comment {
    id: ID!
    content: String!
    author: Author!
    createdAt: String!
}
สถาปัตยกรรมนี้ประกาศประเภทและความสัมพันธ์ของพวกมัน GraphQL จะสร้างเอกสารและตรวจสอบ query ที่ฝั่งเซิร์ฟเวอร์โดยอัตโนมัติ
Resolver ของ Spring GraphQL ทำงานอย่างไร?
Resolver เป็นหัวใจของการดำเนินการ GraphQL แต่ละฟิลด์ schema สามารถมี resolver เฉพาะได้ Spring ใช้ annotation @QueryMapping สำหรับ query ราก และ @SchemaMapping สำหรับความสัมพันธ์
@Controller
public class ArticleController {

    private final ArticleRepository articleRepository;
    private final AuthorRepository authorRepository;

    public ArticleController(ArticleRepository articleRepository,
                            AuthorRepository authorRepository) {
        this.articleRepository = articleRepository;
        this.authorRepository = authorRepository;
    }

    // Resolver สำหรับ Query.article(id)
    @QueryMapping
    public Article article(@Argument Long id) {
        return articleRepository.findById(id)
            .orElseThrow(() -> new ArticleNotFoundException(id));
    }

    // Resolver สำหรับ Query.articles(page, size)
    @QueryMapping
    public List<Article> articles(@Argument int page,
                                  @Argument int size) {
        Pageable pageable = PageRequest.of(page, size);
        return articleRepository.findAll(pageable).getContent();
    }

    // Resolver สำหรับ Article.author - ถูกเรียกสำหรับแต่ละบทความ
    @SchemaMapping(typeName = "Article", field = "author")
    public Author author(Article article) {
        return authorRepository.findById(article.getAuthorId())
            .orElseThrow(() -> new AuthorNotFoundException(article.getAuthorId()));
    }
}
Resolver author ถูกดำเนินการสำหรับแต่ละบทความที่ส่งคืน สถาปัตยกรรมที่ยืดหยุ่นนี้โหลดข้อมูลตามต้องการแต่ทำให้เกิดปัญหา N+1
ผู้สมัครที่ใช้ resolver @SchemaMapping โดยไม่กล่าวถึงปัญหา N+1 แสดงให้เห็นถึงความเข้าใจ GraphQL ที่ไม่สมบูรณ์ ผู้สรรหาคาดหวังการวิเคราะห์นี้อย่างเป็นระบบ
ปัญหา N+1 ใน GraphQL คืออะไร?
ปัญหา N+1 เกิดขึ้นเมื่อ query GraphQL กระตุ้น query เพิ่มเติม N รายการเพื่อโหลดความสัมพันธ์ รูปแบบที่ทำลายล้างนี้เกิดขึ้นอย่างเป็นระบบกับ resolver พื้นฐาน
พิจารณา query ที่ดึงบทความ 50 รายการพร้อมผู้เขียน:
# Query GraphQL
query {
    articles(size: 50) {
        id
        title
        author {
            name
        }
    }
}
ด้วย resolver ก่อนหน้า query นี้ดำเนินการ:
- 1 query สำหรับบทความ 50 รายการ
- 50 query เพื่อโหลดผู้เขียนแต่ละคนแยกกัน
-- Query 1: ดึงบทความ
SELECT * FROM articles LIMIT 50

-- Query 2-51: ผู้เขียนแต่ละคนแยกกัน
SELECT * FROM authors WHERE id = 1
SELECT * FROM authors WHERE id = 2
SELECT * FROM authors WHERE id = 3
-- ... อีก 47 query
การเพิ่มจำนวน query นี้ลดประสิทธิภาพอย่างมาก endpoint ที่ตอบสนองใน 50ms อาจกระโดดเป็น 2 วินาทีด้วย N+1
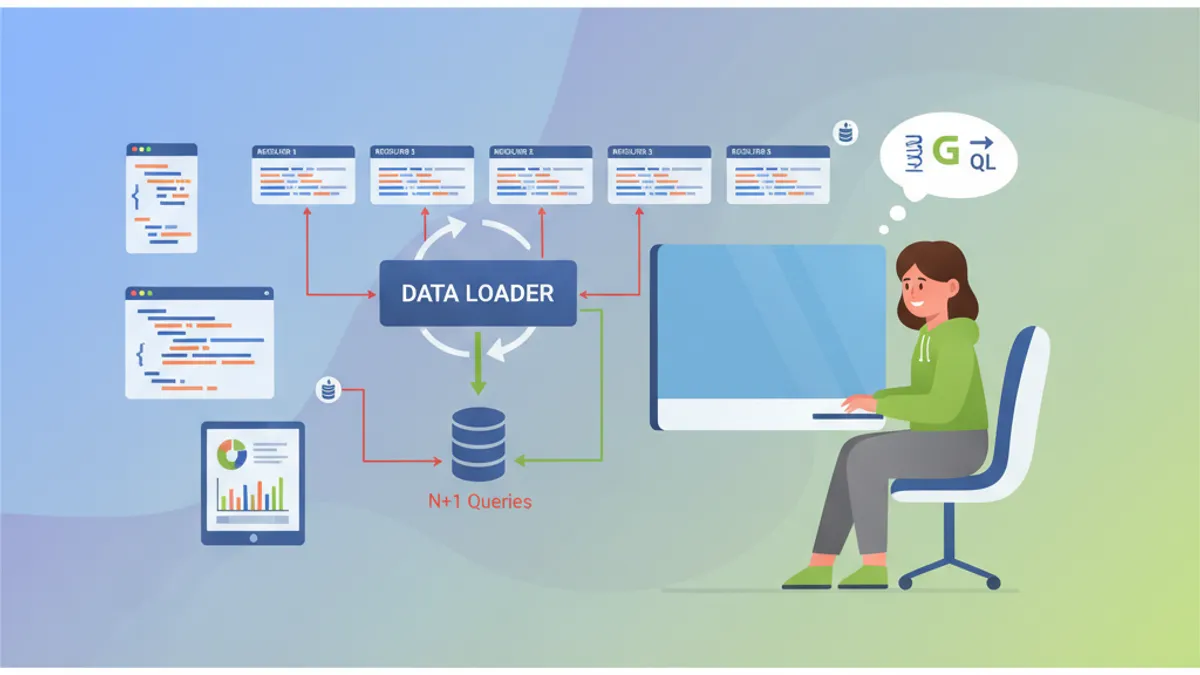
DataLoader ทำงานอย่างไร?
DataLoader จัดกลุ่ม query แต่ละรายการเป็นคำขอแบบกลุ่ม แทนที่จะโหลดผู้เขียนแต่ละคนแยกกัน DataLoader จะรวบรวม ID ทั้งหมดที่ร้องขอและดำเนินการ query เพียงรายการเดียว
@Component
public class AuthorBatchLoader {

    private final AuthorRepository authorRepository;

    public AuthorBatchLoader(AuthorRepository authorRepository) {
        this.authorRepository = authorRepository;
    }

    // วิธีการโหลดแบบกลุ่ม
    public Mono<Map<Long, Author>> loadAuthors(Set<Long> authorIds) {
        // Query เดียวสำหรับผู้เขียนทั้งหมด
        List<Author> authors = authorRepository.findAllById(authorIds);

        // แปลงเป็น Map สำหรับการค้นหาที่รวดเร็ว
        Map<Long, Author> authorMap = authors.stream()
            .collect(Collectors.toMap(Author::getId, Function.identity()));

        return Mono.just(authorMap);
    }
}
การลงทะเบียน DataLoader ทำผ่าน BatchLoaderRegistry ในการกำหนดค่าเฉพาะ
@Configuration
public class GraphQLConfig {

    @Bean
    public BatchLoaderRegistry batchLoaderRegistry(
            AuthorBatchLoader authorBatchLoader) {

        return registry -> {
            // ลงทะเบียน DataLoader สำหรับผู้เขียน
            registry.forTypePair(Long.class, Author.class)
                .registerMappedBatchLoader((authorIds, env) ->
                    authorBatchLoader.loadAuthors(authorIds));
        };
    }
}
Resolver ที่ปรับเปลี่ยนแล้วใช้ DataLoader แทนการเข้าถึงโดยตรง:
@Controller
public class ArticleController {

    private final ArticleRepository articleRepository;

    public ArticleController(ArticleRepository articleRepository) {
        this.articleRepository = articleRepository;
    }

    @QueryMapping
    public List<Article> articles(@Argument int page,
                                  @Argument int size) {
        Pageable pageable = PageRequest.of(page, size);
        return articleRepository.findAll(pageable).getContent();
    }

    // Resolver ที่ปรับให้เหมาะสมด้วย DataLoader
    @SchemaMapping(typeName = "Article", field = "author")
    public CompletableFuture<Author> author(
            Article article,
            DataLoader<Long, Author> authorDataLoader) {

        // DataLoader จัดกลุ่มการเรียกโดยอัตโนมัติ
        return authorDataLoader.load(article.getAuthorId());
    }
}
ด้วยวิธีการนี้ query เดียวกันสำหรับบทความ 50 รายการดำเนินการเพียง 2 query SQL:
-- Query 1: ดึงบทความ
SELECT * FROM articles LIMIT 50

-- Query 2: ผู้เขียนทั้งหมดในครั้งเดียว
SELECT * FROM authors WHERE id IN (1, 2, 3, 4, 5, ..., 50)
พร้อมที่จะพิชิตการสัมภาษณ์ Spring Boot แล้วหรือยังครับ?
ฝึกฝนด้วยตัวจำลองแบบโต้ตอบ, flashcards และแบบทดสอบเทคนิคครับ
วิธีการใช้งาน DataLoader พร้อม Context?
DataLoader ขั้นสูงบางครั้งต้องการ context เพิ่มเติม เช่น ตัวระบุ tenant สำหรับแอปพลิเคชันหลาย tenant หรือตัวกรองความปลอดภัย
@Component
public class SecuredAuthorBatchLoader {

    private final AuthorRepository authorRepository;
    private final SecurityContextHolder securityContext;

    public SecuredAuthorBatchLoader(AuthorRepository authorRepository,
                                    SecurityContextHolder securityContext) {
        this.authorRepository = authorRepository;
        this.securityContext = securityContext;
    }

    public Mono<Map<Long, Author>> loadAuthorsForTenant(
            Set<Long> authorIds,
            BatchLoaderEnvironment env) {

        // ดึง context GraphQL
        GraphQLContext context = env.getContext();
        String tenantId = context.get("tenantId");

        // Query ที่กรองตาม tenant
        List<Author> authors = authorRepository
            .findAllByIdInAndTenantId(authorIds, tenantId);

        Map<Long, Author> authorMap = authors.stream()
            .collect(Collectors.toMap(Author::getId, Function.identity()));

        return Mono.just(authorMap);
    }
}
การกำหนดค่า context ทำผ่าน WebGraphQL interceptor:
@Component
public class TenantInterceptor implements WebGraphQlInterceptor {

    @Override
    public Mono<WebGraphQlResponse> intercept(
            WebGraphQlRequest request,
            Chain chain) {

        // ดึง tenant จาก headers
        String tenantId = request.getHeaders()
            .getFirst("X-Tenant-ID");

        // เพิ่มใน context GraphQL
        request.configureExecutionInput((input, builder) ->
            builder.graphQLContext(ctx ->
                ctx.put("tenantId", tenantId)
            ).build()
        );

        return chain.next(request);
    }
}
ความแตกต่างระหว่าง @QueryMapping และ @SchemaMapping คืออะไร?
คำถามสัมภาษณ์แบบคลาสสิกนี้ตรวจสอบความเข้าใจในลำดับชั้นของ resolver
| Annotation | การใช้งาน | เทียบเท่า |
|------------|-----------|-----------|
| @QueryMapping | ฟิลด์รากของประเภท Query | @SchemaMapping(typeName = "Query") |
| @MutationMapping | ฟิลด์รากของประเภท Mutation | @SchemaMapping(typeName = "Mutation") |
| @SubscriptionMapping | Subscription แบบเรียลไทม์ | @SchemaMapping(typeName = "Subscription") |
| @SchemaMapping | ทุกฟิลด์ของทุกประเภท | รูปแบบทั่วไป |
@Controller
public class EquivalenceDemo {

    // การประกาศสองแบบนี้เทียบเท่ากัน
    @QueryMapping
    public Article article(@Argument Long id) {
        return findArticle(id);
    }

    @SchemaMapping(typeName = "Query", field = "article")
    public Article articleEquivalent(@Argument Long id) {
        return findArticle(id);
    }

    // สำหรับฟิลด์ซ้อนกัน เฉพาะ @SchemaMapping เท่านั้นที่ใช้งานได้
    @SchemaMapping(typeName = "Article", field = "author")
    public Author author(Article article) {
        return findAuthor(article.getAuthorId());
    }

    // ไวยากรณ์ทางเลือกที่มีประเภทเป็นพารามิเตอร์
    @SchemaMapping
    public Author author(Article article) {
        // Spring อนุมาน typeName = "Article" จากพารามิเตอร์
        return findAuthor(article.getAuthorId());
    }
}
วิธีการจัดการ Mutation พร้อมการตรวจสอบ?
Mutation GraphQL แก้ไขข้อมูล Spring GraphQL รวมเข้ากับ Bean Validation เพื่อตรวจสอบอินพุต
# schema.graphqls
type Mutation {
    createArticle(input: CreateArticleInput!): Article!
    updateArticle(id: ID!, input: UpdateArticleInput!): Article!
    deleteArticle(id: ID!): Boolean!
}

input CreateArticleInput {
    title: String!
    content: String!
    authorId: ID!
}

input UpdateArticleInput {
    title: String
    content: String
}
Controller ใช้ @Valid เพื่อกระตุ้นการตรวจสอบ:
@Controller
public class ArticleMutationController {

    private final ArticleService articleService;

    public ArticleMutationController(ArticleService articleService) {
        this.articleService = articleService;
    }

    @MutationMapping
    public Article createArticle(@Argument @Valid CreateArticleInput input) {
        // การตรวจสอบดำเนินการโดยอัตโนมัติ
        return articleService.create(input);
    }

    @MutationMapping
    public Article updateArticle(@Argument Long id,
                                 @Argument @Valid UpdateArticleInput input) {
        return articleService.update(id, input);
    }

    @MutationMapping
    public boolean deleteArticle(@Argument Long id) {
        articleService.delete(id);
        return true;
    }
}public record CreateArticleInput(
@NotBlank(message = "จำเป็นต้องมีชื่อเรื่อง")
@Size(min = 5, max = 200, message = "ชื่อเรื่องต้องมีระหว่าง 5 ถึง 200 ตัวอักษร")
String title,
@NotBlank(message = "จำเป็นต้องมีเนื้อหา")
@Size(min = 100, message = "เนื้อหาต้องมีอย่างน้อย 100 ตัวอักษร")
String content,
@NotNull(message = "จำเป็นต้องมีผู้เขียน")
Long authorId
) {}ข้อผิดพลาดในการตรวจสอบจะส่งคืนข้อผิดพลาด GraphQL ที่มีโครงสร้างพร้อมเส้นทางของฟิลด์ที่ไม่ถูกต้องโดยอัตโนมัติ Spring GraphQL จัดรูปแบบข้อผิดพลาดเหล่านี้ตามข้อกำหนด GraphQL
วิธีปรับ Query ให้เหมาะสมด้วย @BatchMapping?
Annotation @BatchMapping ทำให้การสร้าง DataLoader ในตัว controller ง่ายขึ้นโดยตรง วิธีการนี้หลีกเลี่ยงการกำหนดค่า BatchLoaderRegistry อย่างชัดเจน
@Controller
public class OptimizedArticleController {

    private final ArticleRepository articleRepository;
    private final AuthorRepository authorRepository;
    private final CommentRepository commentRepository;

    public OptimizedArticleController(ArticleRepository articleRepository,
                                      AuthorRepository authorRepository,
                                      CommentRepository commentRepository) {
        this.articleRepository = articleRepository;
        this.authorRepository = authorRepository;
        this.commentRepository = commentRepository;
    }

    @QueryMapping
    public List<Article> articles(@Argument int page,
                                  @Argument int size) {
        return articleRepository.findAll(PageRequest.of(page, size))
            .getContent();
    }

    // BatchMapping สำหรับผู้เขียน - ประมวลผลบทความทั้งหมดในครั้งเดียว
    @BatchMapping
    public Map<Article, Author> author(List<Article> articles) {
        // รวบรวม ID ผู้เขียนที่ไม่ซ้ำกัน
        Set<Long> authorIds = articles.stream()
            .map(Article::getAuthorId)
            .collect(Collectors.toSet());

        // Query เดียวสำหรับผู้เขียนทั้งหมด
        Map<Long, Author> authorsById = authorRepository
            .findAllById(authorIds)
            .stream()
            .collect(Collectors.toMap(Author::getId, Function.identity()));

        // เชื่อมโยงบทความ -> ผู้เขียน
        return articles.stream()
            .collect(Collectors.toMap(
                Function.identity(),
                article -> authorsById.get(article.getAuthorId())
            ));
    }

    // BatchMapping สำหรับความคิดเห็น
    @BatchMapping
    public Map<Article, List<Comment>> comments(List<Article> articles) {
        List<Long> articleIds = articles.stream()
            .map(Article::getId)
            .toList();

        // ดึงความคิดเห็นแบบกลุ่ม
        List<Comment> allComments = commentRepository
            .findByArticleIdIn(articleIds);

        // จัดกลุ่มตามบทความ
        Map<Long, List<Comment>> commentsByArticle = allComments.stream()
            .collect(Collectors.groupingBy(Comment::getArticleId));

        return articles.stream()
            .collect(Collectors.toMap(
                Function.identity(),
                article -> commentsByArticle
                    .getOrDefault(article.getId(), List.of())
            ));
    }
}
@BatchMapping ให้ไวยากรณ์ที่กระชับกว่าการกำหนดค่า DataLoader ด้วยตนเอง โดยยังคงรับประกันประสิทธิภาพเหมือนกัน
วิธีทดสอบ Resolver GraphQL?
Spring GraphQL ให้ GraphQlTester สำหรับการเขียนการทดสอบที่แสดงออกและอ่านง่าย
@SpringBootTest
@AutoConfigureGraphQlTester
class ArticleControllerTest {

    @Autowired
    private GraphQlTester graphQlTester;

    @Test
    void shouldReturnArticleById() {
        // Given: เอกสาร GraphQL
        String query = """
            query {
                article(id: 1) {
                    id
                    title
                    author {
                        name
                    }
                }
            }
            """;

        // When & Then
        graphQlTester.document(query)
            .execute()
            .path("article.id").entity(String.class).isEqualTo("1")
            .path("article.title").entity(String.class).isNotEmpty()
            .path("article.author.name").entity(String.class).isNotEmpty();
    }

    @Test
    void shouldCreateArticle() {
        String mutation = """
            mutation {
                createArticle(input: {
                    title: "ชื่อเรื่องใหม่",
                    content: "เนื้อหาทดสอบที่ยาวพอที่จะตอบสนองข้อจำกัดในการตรวจสอบ",
                    authorId: 1
                }) {
                    id
                    title
                }
            }
            """;

        graphQlTester.document(mutation)
            .execute()
            .path("createArticle.id").entity(String.class).isNotEmpty()
            .path("createArticle.title").entity(String.class)
                .isEqualTo("ชื่อเรื่องใหม่");
    }

    @Test
    void shouldReturnErrorForInvalidInput() {
        String mutation = """
            mutation {
                createArticle(input: {
                    title: "",
                    content: "สั้น",
                    authorId: 1
                }) {
                    id
                }
            }
            """;

        graphQlTester.document(mutation)
            .execute()
            .errors()
            .expect(error -> error.getMessage()
                .contains("จำเป็นต้องมีชื่อเรื่อง"));
    }

    @Test
    void shouldHandleVariables() {
        String query = """
            query GetArticle($id: ID!) {
                article(id: $id) {
                    id
                    title
                }
            }
            """;

        graphQlTester.document(query)
            .variable("id", 42)
            .execute()
            .path("article").valueIsNull();
    }
}
เริ่มฝึกซ้อมเลย!
ทดสอบความรู้ของคุณด้วยตัวจำลองสัมภาษณ์และแบบทดสอบเทคนิคครับ
วิธีจัดการ Subscription แบบเรียลไทม์?
Subscription ช่วยให้สามารถส่งข้อมูลแบบเรียลไทม์ไปยังไคลเอนต์ผ่าน WebSocket
# schema.graphqls
type Subscription {
    articleCreated: Article!
    commentAdded(articleId: ID!): Comment!
}@Controller
public class SubscriptionController {
private final Sinks.Many<Article> articleSink =
Sinks.many().multicast().onBackpressureBuffer();
private final Sinks.Many<Comment> commentSink =
Sinks.many().multicast().onBackpressureBuffer();
@SubscriptionMapping
public Flux<Article> articleCreated() {
return articleSink.asFlux();
}
@SubscriptionMapping
public Flux<Comment> commentAdded(@Argument Long articleId) {
return commentSink.asFlux()
.filter(comment -> comment.getArticleId().equals(articleId));
}
// เมธอดที่ถูกเรียกเมื่อสร้างบทความ
public void publishArticle(Article article) {
articleSink.tryEmitNext(article);
}
// เมธอดที่ถูกเรียกเมื่อเพิ่มความคิดเห็น
public void publishComment(Comment comment) {
commentSink.tryEmitNext(comment);
}
}การกำหนดค่า WebSocket ต้องใช้ dependency เพิ่มเติม:
dependencies {
    implementation("org.springframework.boot:spring-boot-starter-websocket")
}@Configuration
public class WebSocketConfig {
@Bean
public ServerEndpointExporter serverEndpointExporter() {
return new ServerEndpointExporter();
}
}แนวปฏิบัติที่ดีที่สุดด้านความปลอดภัยของ GraphQL คืออะไร?
ความปลอดภัยของ GraphQL ต้องมีการป้องกันหลายชั้นต่อการโจมตีปฏิเสธบริการและการเข้าถึงโดยไม่ได้รับอนุญาต
@Configuration
@EnableMethodSecurity
public class SecurityConfig {

    @Bean
    public SecurityFilterChain filterChain(HttpSecurity http) throws Exception {
        return http
            .authorizeHttpRequests(auth -> auth
                // Endpoint GraphQL ที่ได้รับการป้องกัน
                .requestMatchers("/graphql").authenticated()
                // GraphiQL เข้าถึงได้เฉพาะใน dev เท่านั้น
                .requestMatchers("/graphiql").permitAll()
            )
            .oauth2ResourceServer(oauth2 -> oauth2.jwt(Customizer.withDefaults()))
            .build();
    }
}@Controller
public class SecuredArticleController {
private final ArticleRepository articleRepository;
public SecuredArticleController(ArticleRepository articleRepository) {
this.articleRepository = articleRepository;
}
// จำกัดการเข้าถึงสำหรับผู้ใช้ที่ตรวจสอบสิทธิ์แล้ว
@QueryMapping
@PreAuthorize("isAuthenticated()")
public List<Article> articles(@Argument int page,
@Argument int size) {
return articleRepository.findAll(PageRequest.of(page, size))
.getContent();
}
// เฉพาะผู้ดูแลระบบเท่านั้นที่สามารถลบได้
@MutationMapping
@PreAuthorize("hasRole('ADMIN')")
public boolean deleteArticle(@Argument Long id) {
articleRepository.deleteById(id);
return true;
}
// การตรวจสอบแบบละเอียด: เฉพาะผู้เขียนเท่านั้นที่สามารถแก้ไขได้
@MutationMapping
@PreAuthorize("@articleSecurity.isAuthor(#id, authentication)")
public Article updateArticle(@Argument Long id,
@Argument UpdateArticleInput input) {
return articleRepository.findById(id)
.map(article -> {
article.setTitle(input.title());
article.setContent(input.content());
return articleRepository.save(article);
})
.orElseThrow();
}
}การป้องกันต่อ query ที่ซับซ้อน:
# application.yml
spring:
  graphql:
    schema:
      introspection:
        # ปิดใช้งาน introspection ในโปรดักชัน
enabled: false@Component
public class QueryComplexityInstrumentation extends SimplePerformantInstrumentation {
private static final int MAX_COMPLEXITY = 100;
@Override
public InstrumentationState createState(InstrumentationCreateStateParameters parameters) {
return new ComplexityState();
}
@Override
public InstrumentationContext<ExecutionResult> beginExecution(
InstrumentationExecutionParameters parameters,
InstrumentationState state) {
int complexity = calculateComplexity(parameters.getDocument());
if (complexity > MAX_COMPLEXITY) {
throw new GraphQLException(
"Query ซับซ้อนเกินไป: " + complexity + " (max: " + MAX_COMPLEXITY + ")"
);
}
return super.beginExecution(parameters, state);
}
}บทสรุป
Spring for GraphQL ให้การรวม GraphQL ที่หรูหราเข้ากับระบบนิเวศ Spring การเชี่ยวชาญ resolver, DataLoader และการจัดการปัญหา N+1 เป็นรากฐานของความรู้ที่คาดหวังในการสัมภาษณ์
รายการตรวจสอบการสัมภาษณ์ Spring GraphQL:
- ✅ อธิบายบทบาทของ annotation
@QueryMapping,@MutationMappingและ@SchemaMapping - ✅ อธิบายปัญหา N+1 และผลกระทบต่อประสิทธิภาพของ GraphQL
- ✅ ใช้งาน DataLoader ด้วย
@BatchMappingหรือ BatchLoaderRegistry - ✅ ตรวจสอบอินพุต mutation ด้วย Bean Validation
- ✅ รักษาความปลอดภัยของ resolver ด้วย
@PreAuthorizeและ Spring Security - ✅ ทดสอบ resolver ด้วย GraphQlTester
- ✅ กำหนดค่า subscription สำหรับฟังก์ชันแบบเรียลไทม์
- ✅ ปกป้อง API จาก query ที่ซับซ้อนเกินไป
แท็ก
แชร์
บทความที่เกี่ยวข้อง

สัมภาษณ์ Spring Boot: การกระจายธุรกรรม
เชี่ยวชาญการกระจายธุรกรรมใน Spring Boot: REQUIRED, REQUIRES_NEW, NESTED และอื่น ๆ 12 คำถามสัมภาษณ์พร้อมโค้ดและกับดักทั่วไป

วิธีแก้ปัญหา N+1 ใน Spring Data JPA ปี 2026: Fetch Join และ EntityGraph
คู่มือฉบับสมบูรณ์สำหรับการตรวจจับและแก้ไขปัญหา N+1 ใน Spring Data JPA ครอบคลุม Fetch join, @EntityGraph, batch fetching และกลยุทธ์ประสิทธิภาพการคิวรี

30 คำถามสัมภาษณ์ Spring Boot: คู่มือฉบับเต็มสำหรับนักพัฒนา Java
เตรียมพร้อมสัมภาษณ์ Spring Boot ด้วย 30 คำถามหลักครอบคลุม auto-configuration, starter, Spring Data JPA, ความปลอดภัย และการทดสอบ